Property details (type, full address, subdivision if applicable)
Owner information (name, company name, email, phone, mailing address)
Optional: Staff member details if assigning a property manager
Optional (for multi-unit properties): Unit details such as unit name/number, square footage, bed/bath count, and a photo
Tip: Fields marked with an asterisk (*) are required. If any required field is missing, the system will highlight it and prevent you from saving the property.
Step 1: Log In to Cloud Rental Manager
Go to the Cloud Rental Manager login page.
Enter your Email
Enter your Password
Click Login
After logging in, you will land on the Dashboard. This is your starting point for managing properties.
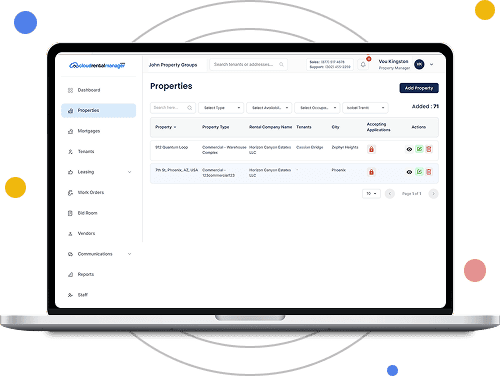
Step 2: Open the Properties Section
From the left navigation menu, click Properties.
This will take you to the Properties list page where all existing properties are displayed.
Step 3: Click “Add Property”
On the Properties page, locate and click the Add Property button (in the top-right corner).
If you already have properties saved, they will appear in a table. If not, the list will be empty.
Step 4: Select a Property Type
The Add Property page includes several sections like Property Information, Insured Value Information, and Residential Unit Details.
You will complete each section before creating the property.
In the Property Information section:
Click the Property Type dropdown
Select the appropriate property type
If the correct type does not exist, you can create one.
Step 4.1: Add a New Property Type (If Needed)
If your desired property type is not listed:
Click Add New Properties
Select a Property Type (e.g., Residential)
Enter a Property Sub Type (e.g., Apartment/Flat)
Check Multi Unit if applicable
Click Add Property Type
Step 5: Enter Property Address Details
Fill in the required address fields:
Address *
City *
State *
Zip Code *
Country *
Subdivision (if applicable)
Make sure all required fields are completed.
Step 6: Add Owner Information
Scroll to the Owner Information section.
Click Add Rental Owner to either:
Select an existing owner, or
Create a new owner
Step 7: Create or Select a Rental Owner
If creating a new owner, enter:
Contact Name *
Company Name *
Primary Email *
Phone Number *
Mailing Address
Then click Add.
If selecting an existing owner, choose them from the list and confirm. After saving, confirm that the owner appears in the Owner table.
You can:
Edit using the pencil icon
Delete using the trash icon
Step 7.1: Assign a Property Manager (Optional)
In the Manager (Optional) section:
Open the dropdown
Select an existing staff member
If the staff member is not listed, click Add New Staff Member and enter the required information:
Staff Member Name *
Designation *
Phone Number *
Email *
Password *
Click Add Staff Member.
Step 8: Enter Insured Value Information
Under Insured Value Information, enter the required:
Date Placed in Service*
Use the date picker or manually enter the date in the correct format.
Step 8.1: Add Historical Insured Value (Optional)
If you track insured value history:
Click Add Historical Insured Value
Select a Year
Enter the Insured Value ($)
Repeat as needed
Use the date picker or manually enter the date in the correct format.
Step 9: Add Residential Unit Details
If the property includes units, complete the Residential Unit section.
Unit Name/Number *
Square Footage (SQFT) *
Number of Beds
Number of Baths
Unit Address (if different)
If the property is multi-unit, click Add Another Unit to add more. If fields appear in red, they must be completed before saving. From the dropdown menus:
Select the appropriate Bed count
Select the appropriate Bath count
Make sure they reflect the correct unit configuration.
Step 10: Upload a Unit Photo (Optional) and Create the Property
To upload a photo:
Click the upload area under Add Photos
Select an image file from your computer
Confirm the file appears as attached
Supported file types are standard image formats. Once all required fields are completed you can click Create Property.
Wait for the system to save. Do not refresh the page during processing. After saving, you will return to the Properties list.
Confirm:
The new property appears in the table
The property count increases
You can view, edit, or delete using the action icons
We use cookies to ensure that we give you the best experience on our website. If you continue to use this site we will assume that you are happy with it.